|
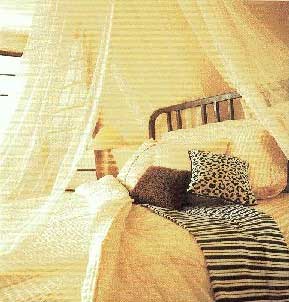 The bed canopy is the simplest way to evoke a plein aire bedroom: a quilting hoop and sheer fabric. The bed canopy is the simplest way to evoke a plein aire bedroom: a quilting hoop and sheer fabric.
Conjure up soft tropical breezes no matter where you live with this sheer hoop canopy. The airy fabric cascades down from a large wooden embroidery hoop, which is suspended above the bed. The fabric is gathered and crimped between the hoop rings.
To evoke the mosquito netting used in the tropics, select a light, sheer fabric. Possibilities include fine cotton batiste, nylon or polyester curtain fabrics, and bridal tulle. The fabric width is not critical since the thinner weights gather readily and can be eased to fit the embroidery hoop circumference. The design shown here features three panels, each 45" wide and 9 feet long. For a more enclosed canopy, consider buying 4 yards of 118"- wide lightweight curtain fabric, and gather and mount the selvage edge.
For other dramatic looks, wrap the panels of the canopy over or through an open headboard or tie a loose overhand knot in the lower third of each panel and rest the knots against the outside corners of the bed.
Materials
- 18" wooden embroidery hoop
- 10-1/4 yards 45" — to 60" —wide sheer fabric
- 3-1/2 yards white seam binding
- White sewing thread
- 2 yards x 3/4" white self-adhesive Velcro
- 2-1/2 yards white cord
- 1" wooden bead (?" hole)
- 3/8" metal pot hook
- 1/2" double-side tape
You’ll also need Sewing machine, scissors, sewing shears, tape measure, fabric marker, safety pins, an an iron.
Instructions
1. Cut fabric. From sheer fabric, cut three 108" —long panels. For frill, cut two 7-1/2" —wide strips from width of fabric. Set 18" embroidery hoop on remaining fabric as templates. Using fabric marker, draw circle 1" beyond hoop edge all around. Cut out 20" circle on marked line.
2. Join sheer circle to inner hoop. Zigzag raw edge of sheer circle to prevent raveling. Remove outer ring from hoop and set it aside. Apply double-sided tape around inner ring. Grip sheer circle by opposite edges and center it over ring, stretch gently until taut, and then and press edges down onto taped rim. Rotate hoop 1/4 turn and repeat. Stretch and secure remaining sections. Trim even with lower edge of rim. Mark outside rim into quarters. Cut four 20" lengths of cord; knot each end. Pin one cord at each mark so knot falls just below lower edge (illustration A). Apply double-sided tape to rim all around.
3. Join and gather panels. Fold and press lower edge of each panel 1/2" to wrong side twice, and then topstitch. Press hemmed edges; press out creases. Place two panels’ right sides together with selvages matching. Beginning at raw edge, stitch selvages together for 1-1/2" only, making 1/4" seam. Repeat to join third panel, then join first and third panels.
4. Measure and divide continuous raw edge into quarters using four safety pins placed 1" from raw edge. Machine-gather entire raw edge to 56-1/2", or to fit around inner hoop. Adjust gathers to align four safety pins to four cords. To hold gathers, stitch seam binding to gathered edge on right side.
5. Join panels to hoop. Arrange gathered edge of panels evenly around inner hoop, aligning safety pins, with cords. Make sure cords extend freely. Once position is confirmed, press gathered section against double-sided tape to secure. Add outer ring to hoop, securing gathered panels and cord within, and tighten screw see (illustration B).
6. Make and attach frill. Stitch two frill strips together at selvages to make continuous loop. Double-hem lower raw edge, same as panels in step 3. Machine-gather top edge to about 63", or large enough to fit around hoop, including screw mechanism. To secure gathers, sew seam binding to gathered edge on right side, same as panels in step 3.
7. Cut Velcro strip to fit once around hoop, including screw mechanism. Separate into hook and loop tapes. Remove backing from hook tape and adhere to hoop. Adhere loop tape to right side of frill, concealing seam binding (illustration C). Fold Velcro edge of frill to inside and press against hoop Velcro all around (illustration D).
8. Suspend canopy. Thread the four hoop cords through wooden bead; knot ends. Cut one 9" cord, and knot ends. Fold cord in half, then push folded end into bead hole from bottom and pull through (illustration E). Screw pot hook into ceiling above bed, securing into beam. Hang canopy from hook, and drape panels around bed. Shorten cord is necessary (illustration F).
Making the Canopy
A. Attach sheer fabric and four cords to an embroidery hoop
back
B. Add sheer panels, and clamp on the outer ring.
back
C. Gather the frill edge and attach self-stick Velcro tape.
back
D. Join the frills to the hoop, concealing the Velcro tape.
back
E. Thread the four cords through a wooden bead; add a hanging loop.
back
F. Screw a pot hook into the ceiling to hang the canopy.
back
Designer’s Tip
For a variation on the tropical netting look, use colored tulle or layer two colors of fabric together. The effect is dreamy and theatrical.
by Chippy Irvine
|