Materials and Supplies
- Medium Weight Card Stock Paper: 8-1/2" x 11"
- Envelopes: 4-3/8" x 5-3/4"
- Steam-a-Seam sticky back
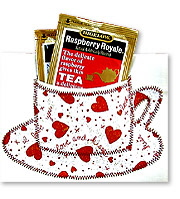
- Holiday or other fabric of choice: 6" x 3-1/2" for each cup
- All-purpose glue
- Tea bags
- Water-soluble pen
- All purpose thread or machine embroidery thread
- 90/14 needle
- Open toe foot
- Pattern
These project instructions are specific to a Brother machine; however, the project can be adapted for use on other machines.
1. Cut the 8-1/2" x 11" card stock paper in half.
2. Fold each piece in half to form a card.
3. Cut out the oval over the cup area (see pattern).
4. Cut a piece of card stock to 5-1/4" x 4". This will cover the stitches and form the pocket on the inside of the card. Note: If you do not have a paper cutter, a rotary cutter will cut the paper very evenly.
5. Set up the sewing machine for sewing.
6. Select the zigzag stitch (1-10) and set the width to 3.0 and the length to 1.0.
7. Trace the cup and saucer on Steam-a-Seam sticky back and press it to the fabric.
8. Cut out and clip around the cup handle.
9. Place the cup on the card.
10. Press the cup in place with an iron.
11. Draw lines to form a stitch guide for the cup and saucer.
12. Starting at the right hand corner of the cup, sew with a zigzag stitch across the top, down the side, and around the right hand corner of the cup.
13. Stitch around the upper edge of pocket oval.
14. Cut and tie off threads.
15. Place needle at the saucer on the left side, stitch around the saucer and cup handle, and then tie off threads.
16. Use all-purpose glue to secure the 4-3/8" x 5-3/4" piece of card stock to the back of the card.
17. Finally, sign and date your card on the back.
Tip: The needle on the zigzag should be half on the fabric and half on the card. When sewing curves, stop with the needle down and turn the card slowly to obtain a smooth look.
Project by Mary Jane Witlin
2/05
|