Cutting. Use pattern A to cut four sections from striped fabric. Measure and cut two 6” x 12” (15 x 30.5cm) rectangles from each solid fabric, and cut two from remaining striped fabric. Using pattern B, cut one from white fabric. Mark dots shown on the seam line of the pattern.
Constructing the Head. On the right side of the white section, stitch down one end of grosgrain ribbon, placing it in the center of the shape. Cut a “V” notch on free end of the ribbon, as shown in photo. With right sides together, pin the white section to one striped section cut from pattern A, matching the curve. Stitch from dot to dot, as marked on white fabric. With right sides together, pin the free portion of white fabric to another striped section cut from pattern A, again matching the curves. Stitch from dot to dot as before. With right sides together, pin and stitch the long sides of these striped sections. Turn right side out. Stuff the head, leaving 2” (5cm) at the opening unstuffed. Pin across the body to hold stuffing firmly in place, and then carefully topstitch across pins. Turn in raw edges of ends and edgestitch. Sew on button eyes.
Constructing the Tail. Pin the remaining two curved striped sections right sides together, and stitch along both sides and around the curved end. Turn right side out. Stuff and finish opposite end as described for constructing the head.
Constructing the Body Sections. Using the cut rectangles, pin into three sets, right sides of fabric together, and stitch the sides and one end. Turn right side out. Stuff firmly and finish opposite end as described for constructing the head.
Attaching the Fasteners. Use different fasteners to join each sections of the touchy worm. The touchy worm shown uses grommets to attach the head to the first body section, followed by large snaps, hook and loop tape, and buttons and buttonholes. Follow package directions to apply grommets, and thread a shoelace through grommets to join the two worm sections.


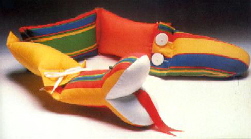 This colorful toy is made in sections. Each part is fastened with a different closure to teach many motor skills.