|
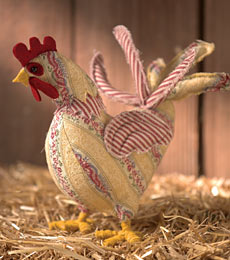 You won't have to cook this colorful stuffed bird – but you will "crow" about how you made it yourself! You won't have to cook this colorful stuffed bird – but you will "crow" about how you made it yourself!
Approximate Crafting Time: 5 hr.
Skill Level: Some sewing experience helpful.
Materials
- 1/4 yard main fabric
- 1/4 yard coordinating fabric
- Glue
- One square gold felt
- One square red felt
- One bag stuffing
- Two 6mm black beads
- Two 12"-long pieces of 18-gauge wire
- Patterns
Note: Enlarge all pattern pieces by 200%.
Directions
1. Trace 2 body patterns (#1) and one center pattern (#2) onto main fabric and cut, leaving an extra 1/4" around edges.
2. With right sides together, sew one body to each side of center, starting at leg opening, and stopping 1/4" from points of center piece. Stitch remaining body together leaving back open as indicated. Fold under leg opening 1/4" and baste around opening, leaving thread to pull up for gathering.
3. To make feet, bend wire pieces 2" from top. Make one loop for the back toes and three for the front, about 1" long. Wrap remaining wire up and around the first 2"-length and trim any excess.
4. Cut 1/4"-wide strips from the gold felt and wrap each foot, gluing where necessary. Insert the feet into the legs and pull gathering stitches tightly around foot and secure with thread. Stuff body. Re-position feet slightly if necessary so rooster stands.
5. Place two pieces of main fabric wrong sides together and trace tail feathers pattern (#3). Stitch on traced line, leaving bottom open. Cut 1/4” away from stitching line, and fringe edges by making small cuts from raw edge to stitching line. Stuff feathers. Hand sew a gathering stitch across opening. Pull to secure ends. Sew or glue feathers in opening on body. Repeat with coordinating fabric, then stitch opening closed.
6. To form the middle of the neck, trace head pattern (#4) onto two layers of coordinating fabric, placed right sides together. Sew on traced line, leaving bottom (points) unstitched. Cut 1/4” away from stitching line, and turn right side out. Stuff lightly and slip over lower neck of body. Add more stuffing if desired and glue in place. To form the head, repeat with main fabric, stuffing near head top, and gluing in place over first the middle neck piece.
7. With wrong sides together of coordinating fabric, trace wing pattern (#5) onto one right side. Stitch on traced line leaving small opening for stuffing. Cut out, leaving 1⁄4" for fringe. Stuff, then stitch opening closed. Stitch two rows through wing to quilt. Glue to side of body. Repeat for second wing.
8. Trace two beak patterns (#6) onto gold felt and cut out. Fold in half and glue together to form beak. Glue in place.
9. Trace two comb (#7) and two wattle (#8) patterns onto red felt and cut out. Glue matching pieces together. Referring to photo, glue in place.
10. Trace four eye patterns (#9) onto red felt and cut out. Glue two together, then sew a black bead to felt eye. Glue on to side of head. Repeat for second eye.
Due to seasonal nature of project, supplies are available at Jo-Ann Stores, Inc. for a limited time only. Please read all instructions prior to beginning; read and follow all manufacturers' instructions for all tools and materials used. Provide adult supervision if children participate in this and all craft projects. Because Jo-Ann Stores, Inc. and joann.com have no control over the use of materials and tools, nor surroundings, during construction of projects, Jo-Ann Stores, Inc. and joann.com disclaim any liability for injury, damage or other untoward results. Content of this project sheet is presented in good faith, but no warranty is given, nor results guaranteed.
Designed by Nancy Valocik
7/05
|


