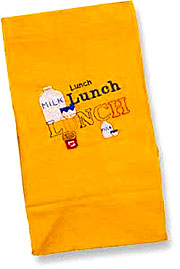
Fill with all kinds of goodies and have a healthy lunch!
Materials and Supplies
Brother or other embroidery and sewing machine
Canvas or duck fabric 12" x 32"
Velcro, 1" wide
Stabilizer
Hoop 5 x 7
Embroidery thread
Level of Difficulty: Beginner
Marking and Construction
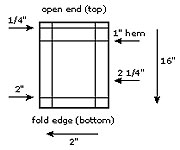
1. Fold fabric in half and mark both sides of 16”-long bag as indicated in the drawing.
2. Embroider the design on one side of the bag placing embroidery between the 1" mark at the top and the 2" mark at the bottom.
3. To form the bottom of the lunch bag, fold the bag in half as above with wrong sides together. Fold each side back again on the 2" marked line (right sides coming together) forming a pleat and pin in place. Stitch the side seams using a 1/4" seam allowance.
4. For the top hem, fold 1/4" to wrong side, then fold again turning down 1”, and stitch. Turn the bag to the right side.
5. To form the sides of the bag, fold the bag along one 2-1/4" line and top stitch about 1/8" from the folded edge; start at one side of top and stitch around bag. Repeat with the other side. Sew Velcro at top inside for a closure.
Project developed by Barbara Tucker, Brother International Educator, and courtesy of Brother. 8/04