This jacket combines Beaded Fringe and Fabric Scrunching
These project instructions are specific to an Elna sewing machines and an Elna 945 or 745 serger; however, the project can be adapted for use on other machines.
Beaded Fringe
Foot/Attachment
Bias Binder Attachment
Attachment Holder Set
Fabrics and Notions
Beads (large hole)
1/2 m (1/2 yd) fabric
2 cones serger thread
1 cone thread
Instructions
1. Set up your serger for Chainstitch.
2. Cut bias strips 4 cm (1 1/2") wide. Approximately 4-6 m (4-6 yd) depending on length and placement of fringe.
3. Insert bias strip into binder; attach it to machine. Sew all strips.
4. Cut bias strip into predetermined lengths and insert one end into a bead. Secure with a knot.
5. Arrange fringe lengths on seam line. Use a basting stitch on your sewing machine to fasten fringe lengths. Sew seam together.
Fabric Scrunching
Fabrics and Notions
1/2-1 m (1/2-1 yd) fabric
1 cone serger thread
1 spool Pearl Crown Rayon™, Candlelight™, Designer 6™ or Decor™
Fusible lightweight interfacing
Rubber bands
Teflon™ coated pressing sheet
Instructions
1. Wet fabric and scrunch into a ball. Hold together with rubber bands. Let fabric dry naturally or place in dryer.
2. When fabric is dry, pin (only use glass headed pins) wrong side of fabric to fusible side of interfacing. Interfacing should be 2" larger than the pattern piece.
3. Turn on your Elnapress to temperature appropriate for interfacing and fabric type.
4. Using the Teflon coated pressing sheet, press scrunched fabric to interfacing.
5. Remove all pins.
6. Set up your serger for Deco Chainstitch (decorative thread is on chain looper) with SL at 3.5.
7. Place scrunched fabric face down (interfacing side up) on serger bed.
8. Sew randomly over surface to decorate and permanently secure scrunched effect into place.


 This jacket combines Beaded Fringe and Fabric Scrunching
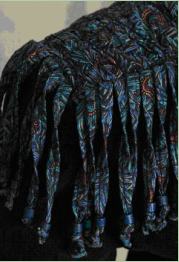 Instructions
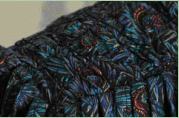 Instructions