Lay pattern on the fabric. Draw around the pattern. TIP: do not cut out until the embroidery is finished.
Cut out the lining pieces.
Cut piece of decorative fabric 4” x 14” for use as the cuff.
Cut one piece of stabilizer to fit in the border hoop. (Stocking front)
Cut one piece of stabilizer 4” x 14”
This project utilizes a Brother ULT machine; however, the project can be adapted for other machines. The stocking uses Brother Border Frame Kit and Decorative Buttonhole Kit.
Sewing Instructions
(All seams are 1/4”)
Take the two pieces of decorative stocking fabric and align them at the front center seam (Do not sew them together)
Mark these stocking pieces for the buttonhole placement.
Set up the Brother ULT for embroidery. (Make sure the machine has been updated for the border and buttonhole kits.) Hoop with stabilizer and stitch out the buttonholes in each half of the stocking.
Cut out the stocking pieces.
Set up the Brother ULT machine for sewing.
Place the two buttonhole stocking pieces right sides together and straight stitch the front center seam down to the start of the foot. Press the seam open.
Set up the Brother ULT machine for embroidery. Hoop the stocking and stabilizer in the Brother Border Kit hoop, centering the pressed seam in the center of the hoop.
Refer to the instructions in the border kit and select a border design. Embroider the design down the front seam.
Remove the stocking from the hoop.
Center the 4” x 14” piece of decorative fabric and stabilizer in the Brother Border hoop so the border will be stitched along the 14” length of the fabric and it is approximately 1” from the top edge of the piece.
Refer to the instructions included with the Border Frame Kit. Choose one of the decorative borders. Embroider the border repositioning as necessary. (It will take at least two continuous borders to total 12”)
Remove the fabric from the hoop.
Set the machine for sewing.
Fold the stocking in half right sides together. Straight stitch around the stocking using a 1/4 inch seam allowance. (Be sure to leave the top open.)
Attach the cuff to the top of the main stocking, making sure the border or several borders are closer to the stocking side than the top.
With right sides together, straight stitch the lining pieces together. Clip the curved areas of the seam. Turn right side out.
Slip the lining into the stocking.
When the lining and stocking are together turn down the cuff to meet the lining and top stitch with a decorative stitch.
Hoop an additional piece of fabric in the Brother Border hoop and make a hanger if desired.
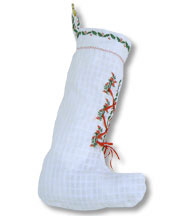
Cut open the buttonhole (be sure to only cut the buttonhole on the main fabric and not through the lining) and lace your stocking as desired.