|
 Note: The finished eagle requires a 13” (33cm) square area. Note: The finished eagle requires a 13” (33cm) square area.
Materials
- 1/2 yard (0.50m) firmly woven, heavy white fabric for bag
- Lightweight fabrics for appliqués: 5” (12.5cm) squares of Red, Royal Blue, and Turquoise
- 5” x 7” rectangles of Medium Blue and Navy; 3” (7.5cm) square of Light Blue
- Thread to match fabrics
- 1 1/8 yard (1.10m) of 1 1/2" (3.8cm) wide webbing for handles (royal blue if available)
- Six-strand embroidery floss: 1 skein each of Coats and Clark #132-A Parakeet, and Coats and Clark #44 Royal Blue
- Tracing paper
- Dressmaker’s carbon paper and tracing wheel
- Fusible web with paper backing
- Embroidery needle
- Appliquéd Eagle Pattern (pdf)
Directions
Using the white bag fabric, cut two rectangles, each 14 1/4” (36cm) wide x 14 5/8” (36.5cm) high.
Copy the eagle design and star using tracing paper.
Make a separate pattern for the star and each different color portion of the eagle, carefully following the outlines and noting the right side of each pattern piece. Also indicate all detail lines on the individual pattern pieces. Note: The claws and talons are embroidered rather than appliquéd; trace these shapes, but do not make separate pattern pieces. (See Key to Eagle Design.)
Using fusible web with a paper backing, fuse the product onto the wrong side of the five different colored fabrics. Do not peel the paper off until later. Following the color key given with the design, place the right side of each pattern piece against the paper on the appropriate color of fabric, and trace around the outer edges of each shape. Cutting through all layers, cut out the appliqué pieces.
Using dressmaker’s carbon paper and a tracing wheel or pencil, transfer the detail lines onto the fabric of the appliqué shapes.
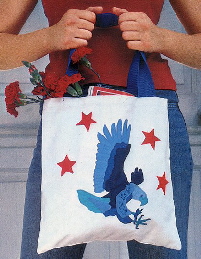
Press under a 1” (2.5cm) hem at the top of one of the white rectangles. Position the appliqué shapes to form an eagle, and so that the eagle is centered on the bag. Position the stars as shown on the photo.
Working carefully and methodically, remove the paper backing from each shape and fuse the appliqué shapes in place. Follow the manufacturer’s instructions for fusing.
Using thread to match the color of the shape, stitch along the detail lines with a narrow zigzag stitch.
Using dressmaker’s carbon and a tracing wheel or sharp pencil, transfer the traced talons and claws in the correct position on the front of the bag.
Key to Eagle Design
R - Red
RB - Royal Blue
T - Turquoise
MB - Medium Blue
P - Parakeet
N - Navy
LB - Light Blue
__________ Design outline
……………. Embroidery Line
----------------- Zigzag Stitching Line
|
|
Embroidery
Forming a satin stitch with two strands of floss and following the color key, embroider the talons, claws, and eye. On the body of the eagle, embroider scattered fly stitches with the parakeet and blue colors.
Finishing
With right sides together, pin bag front to bag back. Stitch around the sides and bottom in a 5/8” (1.5cm) seam. At top edge, press under 1/4” (6mm); then turn the hem down 3/4” (2cm), press and stitch close to this folded edge.
To form the handles, cut webbing into two pieces and zigzag the cut ends to minimize fraying. Pin ends of one piece of webbing to the inside of the bag front, 2” (5cm) from side seams, so handle ends are even with the bottom of the hem. Attach handle by stitching through all bag and handle layers: stitch in a rectangular shape within the hem allowance, going around each handle end twice. Repeat on back of bag. Turn bag right side out and press.
7/03
|


