Push the creative limits of your serger past the basic clean finished seams and speedy piecing to create decorative accents that cannot be duplicated using a sewing machine. This classic linen camisole is a perfect example of a simple garment sewn from a plain fabric made more visually interesting by the addition of embroidery and unique serger stitch applications. The project is simple, fast, and easy with great high-end retail appeal. The creative work found here could easily be translated into a pillow top, dress front or decorative panel on a tote bag.
- Pattern: Any simple, pullover style tank top pattern
(sample uses New Look #6483)
- Fabric: Linen fabric – yardage per pattern, plus ¼ yard
- Serger: BERNINA® serger with 2-thread flatlocking capabilities
- Design: Studio BERNINA® Exclusive Design Collection, The Linen Closet
Thread: Serger thread in 2 colors:
- 4 cones all-purpose thread for seaming (matching fabric)
- 2 cones all-purpose thread for decorative work (contrasting color)
- 1 cone texturized polyester thread such as YLI Wooly Nylon (contrasting color)
- Notions:
- 1 yard of ½” wide elastic
- 1½ yards ¼” wide satin ribbon
- 2 yards of 2” wide double-faced satin ribbon
- OESD Tear-away stabilizer
- HRFive Temporary Spray Adhesive
- Presser Foot: Edgestitch Foot #10/10C (for sewing machine)
These project instructions are specific to a Bernina sewing machine; however, the project can be adapted for use on other machines.
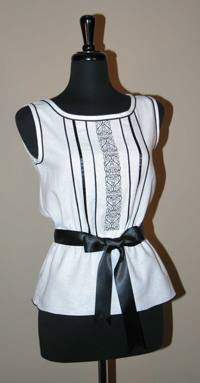
Overview of Camisole
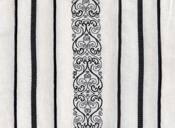
The camisole design features embroidery on the front, framed on the right and left with alternating rows of double stitched serger tucks and ribbon woven flatlocking. Rows are positioned 1” apart, measured from the outer left and right sides of the center embroidery on the front. The camisole back does not have center embroidery. Flatlock ribbon weaving is serged at center back, framed by a pair of double stitched tucks, one each on the left and right sides.
Preparation
- Cut out camisole front and back pieces, adding 1” to side seams.
- Do not cut out facing pieces – will be replaced with bias bindings.
- Using an iron, crease-mark the centerlines on the front and back.
- Add length to the pattern pieces.
Embroidery
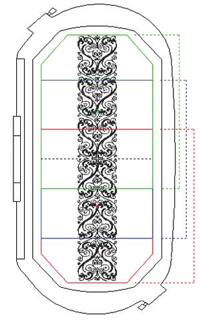
Embroider the design of your choice along the crease marked centerline on the front piece. The sample shows design #BE10228 from the Studio BERNINA® Exclusive Design Collection, The Linen Closet.
Position stabilizer on the wrong side of the fabric, using temporary adhesive to secure; hoop the bonded layers as one. This design was duplicated and mirror imaged horizontally to create the heart-shaped design; it was then mirror imaged vertically to complete the embroidered band. It was also enlarged to Mega-Hoop size in order to stitch the largest design possible. After stitching is complete, remove all stabilizer from the embroidery and prepare to serge.
Double Stitched Serger Tucks
Elegant, well defined tucks that appear to be fabric bound are easy to accomplish using a new, double-stitched overlock technique. Thread serger for a narrow 3-thread rolled hem following the settings at the bottom of the page.
Draw a line 1” to the left and right of the outer edge of the center embroidery. With wrong sides together, press a fold along one drawn line. Serge along the folded line, positioning the fabric so that the stitches fall at the edge.
Raise the upper knife. Stitch a 2nd time over the previous row of stitching. Position the needle so that it sews just slightly to the left of the first set of needle stitches. This 2nd row of stitches will fill any gaps in the 1st row, creating dense thread coverage, replicating a bound tuck. Repeat for the second tuck.
Flatlocked Ribbon Band
Thread serger for a 2-Thread Wide Flatlock stitch following the settings at the bottom of the page. On the wrong side of the fabric, draw a line 1” away from the serger tuck, towards the side seam. With right sides together, fold the camisole along the drawn lines. Serge rows of flatlocking along these lines. Pull the flatlock band flat, creating the “ladders” portion of the stitch on the front of the camisole. Weave ¼” wide ribbon through the flatlock ladders, securing the ribbon tails at the top and bottom of each row.
Double Stitched Serger Tucks
Repeat the previous directions, serging in another set of double stitched tucks 1” away from the flatlock ribbon bands.
Camisole Back
Follow the directions above to mark and serge a centered flatlock ribbon band, framed by a row of double stitched tucks to the left and right.
Convert serger to a 4-thread overlock stitch and serge the seams in the following order: Front to back at shoulders, then front to back at side seams.
Added Peplum
A gently gathered peplum was added to the basic tank pattern to soften the original pattern design.
Measure and cut the camisole 1½” below the waistline to allow for blousing and a seam allowance at the waist.
Cut an 8” piece of linen the front to back measurement of the camisole, plus 1” for two ½” seam allowances. Serge-seam the short sides of the peplum, forming a circle.
Adjust the differential feed to 2.0. Gently gather one of the long top edges by serging it with the adjusted feed setting. Return differential feed to “N”, serge-seam the peplum to the camisole bottom.
Double Rolled Hem Finish
As with the double stitched tucks, a rolled hem, stitched 2 times at the lower edge gives a custom piped look to the bottom of the camisole and outer edges of the bindings at the armholes and neck edges.
Roll hem along the lower edge of the peplum. Raise the upper knife. Serge a second time over the previous row of stitching. Position the needle so that it sews slightly to the left of the previous row of stitching.
“Piped” Bias Binding
“Piped” bound edges are easy to serge using the same double stitching technique as for the lower hem. Serging the finished bindings in place after edging yields a narrow seam that will not need to be clipped to allow for a smooth roll to the right side.
Set serger for the same roll hem settings as the double rolled edge hem. Cut 3” wide strips of bias linen the length of the armholes and neckline. Add 1” to each of these bias cut linen measurements for seam allowances.
With wrong sides together, press the bias strips in half. Roll hem the folded edge twice, following the directions for the double stitched hem edge.
Convert serger to a basic 4-thread, balanced overlock stitch. Pin the cut edges of the bias strips to the wrong side of the neckline and armholes. Serge-seam in place.
Flip the bindings to the garment right side; the seam allowances will be covered by the bias strips. Machine stitch the bindings in place along the rolled hem edge using a sewing machine and the Edgestitch Foot #10/10C.
Elastic Waistline
Measure around the camisole waistline and cut a 1½” wide strip of linen this length, plus 1”. This is the casing for the elastic; press under ½” at each short end.
From the garment interior, position and straight stitch (using a sewing machine) the casing in place, beginning and ending at a side seam. Cut elastic a comfortable waistline measurement. Guide elastic into casing, stitching to secure at the ends.
Ribbon Carriers
Serge approximately 12” of roll hem chain (without fabric) for the ribbon loops. Using a large eye, hand-sewing needle, sew the ribbon loops into the right and left side seams at the waistline. Thread the 2” satin
Serger Settings
4-Thread Overlock Stitch:
- Right and left needles: all-purpose serger thread - tension 5
- Upper and lower loopers: all-purpose thread - tension 5
- Cutting width – 2½
- Stitch length – 2
3-Thread Overlock Stitch:
- Right needle and lower looper: all-purpose thread - tension 5
- Left needle removed
- Upper looper: texturized nylon thread - tension 4-5
- Cutting width – 2½
- Stitch length – 2
3-Thread Rolled Hem:
- Right needle – all-purpose thread – tension 5
- Left needle - removed
- Upper looper - texturized nylon thread - tension 4-5
- Lower looper – all-purpose serger thread - tension 7-8
- Cutting width: 1
- Stitch length: 1½
2-Thread Wide Flatlock:
- Left needle – all-purpose thread – tension 0 - 1
- Lower looper – all-purpose thread – tension 5
- Upper looper converter installed
- Cutting width*: 4
- Stitch length: 4
*Note: If working on a BERNINA serger with mtc (Micro Thread
Control), adjust the mtc knob to its widest setting. This will build in more
“wiggle room” in the stitch formation and create an extra-wide flatlock
stitch.
By Nancy Bednar
8/07
|