These project instructions are specific to a Brother sewing machine; however, the project can be adapted for use on other machines.
Cut six pieces of fiberglass window screening (pattern attached).
Using the decorative thread and the decorative stitches found on your Brother CS-8060, work 3-4 rows of stitching across each panel... no pattern required... just stitch across each piece in any direction, crisscrossing as you go.
Rethread your Brother sewing machine with the black sewing thread.
Place two pieces together (making sure the right sides are together - no bobbin thread on the right side) stitch the edges together as you would a normal seam using a 1/4" (6mm) seam allowance. Stitch third panel to the two already stitched together. Repeat with the other three panels and then stitch the two sets together.
Cut three pieces of "boning" - be sure to measure your bonnet. Each piece needs to be long enough to go from one side up and over the top to the other. Longer is better... you can always trim the extra length later.
Turn the bug bonnet inside out. Using your straight stitch, stitch each side of the boning to the bug bonnet following the three seams - from the bottom of one side across the top to the other side. Boning has a natural curve, be sure to follow the curve of the seam when attaching the three pieces. Optional step... add boning around the bottom to create a firm circular shape to your Bug Bonnet.
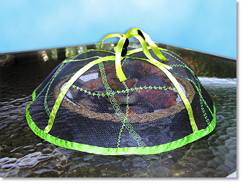
Attach a "handle" to the top using ribbon with decorative beads or buttons, a ready made tassel, or make a loop with the left over boning scraps. Use your imagination!