|
 Have you ever wondered if it's okay to choose a different button size than what's specified on the pattern envelope? Or maybe you've used a different size button but have achieved varying results. Understanding how patterns are developed will enable you to change the button size with confidence. In this column, we'll focus on horizontal buttonholes in a garment such as a blouse that buttons at center front. Have you ever wondered if it's okay to choose a different button size than what's specified on the pattern envelope? Or maybe you've used a different size button but have achieved varying results. Understanding how patterns are developed will enable you to change the button size with confidence. In this column, we'll focus on horizontal buttonholes in a garment such as a blouse that buttons at center front.
Selecting a slightly different button size (up to 1/4" larger or smaller) usually does not cause a problem. But using a 1" button when a 1/2" button is called for requires a simple pattern revision. This pattern revision is easy to do once you understand the ideal proportion between the diameter of the button, center front, and the edge of the garment.
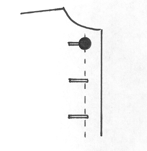
Buttons should be at center front. When the blouse is buttoned, the garment will look symmetrical on the body if the buttons sit exactly in the middle of the front of the garment, i.e., at center front. If the garment itself ended at center front, the buttons would hang out over the finished edge of that side of the blouse. In order for this not to happen, the pattern is extended beyond center front.
How much is the pattern extended? The extension should be equal to the diameter of the button. This creates the ideal proportion between the button and the edge of the garment.
 The ideal proportion. When the garment is closed, the amount of fabric that shows beyond the button should be equal to the radius (half of the diameter) of the button. If a 1" button is being used, then the pattern is extended 1" beyond center front, and 1/2" of fabric shows. The ideal proportion. When the garment is closed, the amount of fabric that shows beyond the button should be equal to the radius (half of the diameter) of the button. If a 1" button is being used, then the pattern is extended 1" beyond center front, and 1/2" of fabric shows.
Using the wrong size button. If a pattern calls for a 1" button, and you decide to use a 1/2" button, two unsatisfactory things can happen: (1) If you use the original buttonhole placement on the pattern, the amount of fabric showing beyond the button will be increased from 1/2" to 3/4", making the extension larger than the button. (2) If you moved the buttonhole over 1/4" so that the extension was in proportion to the button, the center front of the garment is moved, which would increase the circumference of the garment by a total of 1/2" (1/4" for the left front and 1/4" for the right front).
Selecting a different size button. What happens if you've found great buttons for your garment, but they're 1/2" smaller than the pattern envelope specifies? Simply change the pattern before cutting your fabric. The center front remains the same - it's the amount of the extension that changes.
Changing the extension. To avoid confusion, make sure that center front is clearly marked on the pattern. Determine the new extension amount - in this case 1/2" - and draw a new line 1/2" away from center front. If the garment's facing is attached, this line also becomes the fold line for the facing. If the garment has a sewn on facing, you'll need to draw another line (beyond the extension line) adding the seam allowance; this line then becomes the cutting line.
Don't hesitate to change button sizes in the future - now that you know how the extension for buttons is developed, you can be more creative than ever with your garments!
|

