|
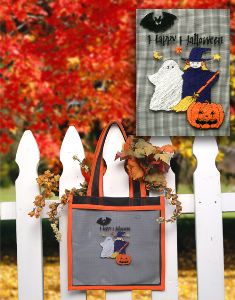
 This Halloween bag is so simple it’s a treat to make! This Halloween bag is so simple it’s a treat to make!
Skill Level: Beginning-Intermediate
Supplies
- Ellagéo, Esanté, Elluré, BL60E
- Baby Lock card 8 (BLEC-8)
- A variety of embroidery threads
- Evolve Serger or Cover Stitch Machine
- Double Fold Bias Binder (BLE8-S2)
- 2 spools Maxi Lock Serger thread (to match bias)
- Palette software
- Designer's Gallery Studio
- Density Works
- 2 pieces of 12” x 12” fiberglass screen
- 2 pieces of 24” x 3” fiberglass screen for handles
- 5 yards 1”-wide bias fabric strip
This project is specific to a particular brand of sewing machine, notion, fabric and/or supply. However, the project may be easily adapted to other brands.
Instructions
1. Import the witch and ghost design (#6) from card 8 (BLEC-8) Small Holiday into Layout & Editing.
2. Import the pumpkin design (#7) also from card 8.
3. With the design selected, move the pumpkin to the bottom by the witch's feet.
4. Import design Happy Halloween (#33) and move it above the ghost and witch.
5. Import the bat design (#8) and move into place above the words.
6. Save this combination.
7. Open Designer's Gallery Studio and browse to locate the previously saved design.
8. Select the design, and then under Tools in the menu bar, choose Density Works.
9. View the density map of your design and choose to remove hidden stitches. Save the design and exit out of the tool pack.
10. Using the tools on the top toolbar, color sort the design, then add a baste stitch around the design. Save the final file.
11. If using an Ellagéo, save the file to a floppy disk. If using any other Baby Lock Embroidery machine, use the Paletté to write the design to card.
12. Embroider the design in the center of one of the 12" screen pieces. Use water-soluble stabilizer on top and bottom of the screen.
Assembly
1. Set up the Evolvé with a chain stitch and the double folded bias binder.
2. Place the front screen piece and back piece together wrong sides together.
3. Attach bias tape to the 2 sides.
4. Attach bias tape to the bottom, folding unfinished edge on both sides
5. Serge bias tape along both long edges of the two 24" x 3" pieces for handles.
6. Serge bias tape across the top edge of the bag. Fold down 2 inches.
7. Using a cover stitch, chain stitch, or sewing machine, attach handles to front and back pieces on wrong side.
Created by Jennie Glanton, Baby Lock Event Specialist
9/03
|

