|
 Appliqué is fast and easy with a Brother embroidery machine, but any machine with embroidery capability can be used. Appliqué is fast and easy with a Brother embroidery machine, but any machine with embroidery capability can be used.
Materials
- 1/2 yard natural colored medium-weight fabric (we used Osnaburg)
- Eight 8” x 9” pieces of complementary red print fabric
- 1 package black double-fold extra-wide bias tape
- 1 package black single-fold bias tape (1/2” wide)
- Red Brother embroidery thread #800
- 30 wt. black cotton embroidery thread
- Black sewing thread
- Sewing thread to match your pillow fabric
- Lightweight tear-away stabilizer
- Temporary spray adhesive
- Erasable marking pen or pencil
- Glue stick (optional)
- 16” pillow form
Level of Difficulty: Beginner
Important Note: These project instructions are specific to a Brother embroidery machine; however, the project can be adapted for use on other machines.
Instructions
1. Choose the built-in frame patterns. Select the heart and the single straight stitch.
2. Hoop one piece of red fabric in the 4” x 4” embroidery frame and stitch the heart in the default size. Remove the fabric from the frame and remove the thread crosshairs. Carefully cut out the heart on the stitching line. Repeat the process with the other seven red fabrics.
3. Cut one piece of the pillow fabric 16” square. With an erasable pen or pencil, draw lines dividing the square into thirds both horizontally and vertically. Make a 2” crosshairs with thread to mark the center of each square.
4. Hoop a piece of stabilizer. Spray with temporary spray adhesive and attach your background fabric, using your plastic placement sheet to make sure the fabric is straight. Attach the frame to the machine.
5. Choose the built-in heart frame pattern with single straight stitch once again. Reduce the size of the heart one click. Position the needle directly over the center of the crosshairs and stitch the design. Remove the thread crosshairs.
6. Choose the built-in heart frame pattern and the buttonhole stitch (also called an Appliqué stitch). Keep the default settings and appliqué the heart to the pillow.
7. Repeat this step for the remaining seven hearts.
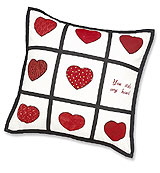
8. Embroider the phrase “You stole my heart.” according to the following directions depending on what type of embroidery machine you have.
For a Brother embroidery machine without editing capability:
A. Choose a font from the built-in fonts in your machine or Brother Memory Card #1. Choose size medium. Type in the words “You stole”. Do not include the quotation marks. Press “Set”, then touch the “Enlarge/Reduce” icon. Depending upon which font you chose, enlarge or reduce the phrase so that it is about 7.8 cm long. Count the number of clicks while you are changing the size and write down that number. Press “Set”, then choose “Layout”. Use the arrows to move the phrase up 25 clicks. Press “End” and embroider the phrase.
B. Choose the font in size medium once again and type in the phrase “my heart.” Press “Set”, then touch the “Enlarge/Reduce” icon. Enlarge or reduce this phrase the same number of clicks as you did with the previous phrase. Press “Set”, then touch the “Layout” icon. Move the phrase up 25 clicks. Press “End” and embroider the phrase.
For a Brother embroidery machine with editing capability:
A. Choose Embroidery Edit mode. Choose a font and program in the phrase “You stole”. Size the design so that it is about 7.8 cm long. Count the number of clicks. Move the phrase up about 25 clicks. Press “End”.
B. Program the phrase “my heart.” in size medium. Reduce or enlarge the phrase the same amount that you did for the previous phrase. Use the arrow to move the phrase down 25 clicks. Press “End” and stitch the phrase.
9. Cut four pieces of the single fold bias tape 16-1/2” to 17” long. Pin or use glue stick to attach two strips of bias tape along the vertical lines you previously drew on the pillow top. Edge stitch along both sides of the bias tape using black thread. Repeat for the horizontal rows. Trim the ends of the bias tape even with the pillow top.
10. Cut two pieces of pillow fabric about 14” x 16”. On the right 16” side of one piece, turn under 1”, then turn 1” again. Stitch about 7/8” from the folded edge. On the left 16” side of the other piece, repeat the process.
11. Place the pillow front right side facing down. With the right side of the pillow back facing up, align the raw edges of the pillow back pieces with the raw edges of the front piece, having the finished edges overlapping. Pin and baste.
12. Cut four pieces of the black, double-fold bias tape 18” long. Starting on a pillow side, open out the tape. Extend tape 1” on either end. Line up the narrow side of the bias tape with the pillow edge, right sides together and pin or glue. Stitch along the fold line of the bias tape. Fold the tape over to the back of the pillow and pin. You can either stitch-in-the-ditch or stitch the bias tape to the back of the pillow by hand. Repeat for the other side, and trim the bias tape even with the pillow's edges.
13. Attach the bias binding to the top and bottom of the pillow in the same manner, except fold under the short edges of the bias tape after stitching the tape to the front and before turning it to the back. This will finish the ends of the binding.
14. Insert the pillow form and you are finished!
Project developed by Jocelyn C. Bates
2/06
|


