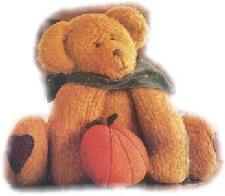
 Supplies Supplies
- Felt*
- golden honey shaggy plush, 18 x 22-1/2 inch (45.7 x 55.9 cm) craft cut
- pumpkin, 9 x 12 inch (22.9 x 30.5 cm) sheet
- cinnamon, 6 x 9 inch (15.2 x 22.9 cm) rectangle
- hunter green, 2 to 3 inches (5.1 to 7.6 cm)
(*Kunin Rainbow® Shaggy Plush and Felt Classic were used in the sample project.)
- Cotton fabric print, 6 x 18 inch (15.2 x 45.7 cm) strip for kerchief
- Polyester fiberfill
- Polypropylene pellets, 6 ounces
- 6mm black eye beads, two
- Brown embroidery floss
- Needles: soft sculpture; sewing
- Miscellaneous items: upholstery thread; tracing paper; pencil; marker; straight pins; scissors; powder blush; sewing machine; matching threads; fabric glue or low-temp glue gun.
- Pattern (pdf)
Note: Pattern pieces need to be ENLARGED 25%.
Instructions
Wash and line dry the shaggy plush felt before using. Trace the patterns after enlarging and cut out. When sewing, use a 1/4-inch (0.6 cm) seam allowance.
To make the head, sew the fronts together at the center seam. Pin the back to the front, matching the letters. Sew from A to B.
Stuff the head with fiberfill, stuffing the nose very firmly. Sew a gathering stitch around the bottom of the head; pull threads tight, knot and trim.
For each eye, thread the sculpture needle with a double length of upholstery thread and knot the ends. Insert the needle through the bottom of the head, through the eye placement, then through the bead, back through the eye to the bottom of the head. Pull the threads to indent slightly; knot to secure.
For each eyebrow, thread the needle with two strands of embroidery floss and knot the end. Insert the needle at the bottom of the head and pull through slightly above the eye. Make a long, angled stitch through the head and back to the bottom; knot to secure.
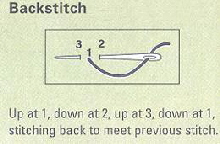
Pin the nose in place. Begin at the point and use two strands of embroidery floss. Use small blanket stitches (see diagrams of embroidery stitches) to attach the nose to the face.
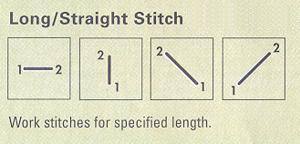
For the mouth, with the last stitch at the bottom point, bring the needle out and make a 1/2-inch (1.3 cm) straight stitch down the center seam. Bring the needle out 3/8 inch (1.0 cm) to each side and backstitch.
For the ears, align each pair right sides together and stitch around the curved edge. Clip curves and turn. Slipstitch the raw edges together. Refer to the pattern for ear placement and slipstitch the ears to the head.
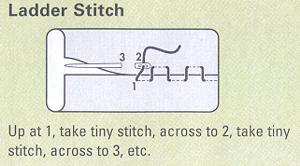
Sew the body front to back leaving the neck edge open; clip curves and turn. Stuff the feet and lower body with pellets and the remaining part of the body with fiberfill. Sew a gathering stitch around the neck. Pull the threads tight, knot and trim. Blanket stitch (see diagrams of embroidery stitches) the hearts to the feet with two strands of embroidery floss.
For each arm, align and sew two arm pieces, leaving open as indicated. Clip curves and turn. Fill each arm halfway with pellets then stuff to the top with fiberfill. Sew a gathering stitch around each opening and pull thread ends tight; knot and trim.
Thread the soft sculpture needle with double upholstery thread and knot the ends. Insert the needle through the X on the body, and then through the X on the arm, making sure the arm is facing forward. Make several stitches through the body and arm to secure. Pull the threads tight so the arm is snug. Bring the needle from the joint up through the neck, and knot the threads at the neck.
To attach the head, use hot glue or stitch in place. To stitch, use double upholstery thread and knot the ends. Insert the needle at the center bottom of the head and slipstitch around the head and top of the body several times. Loosely stitch and pull tight all at once. Knot securely and trim the ends. To glue, place hot glue on the bottom of the head and press firmly in place on the center top of the body.
Apply blush to the cheeks.
For the kerchief, fold the fabric in half lengthwise and cut diagonally to form a triangle. Tie around the bear's neck.
To make the pumpkin, sew the two pieces right sides together, and clip curves. Cut a slit in the center of one side only, turn right side out, and stuff with fiberfill. Work ladder stitches (see diagrams of embroidery stitches) to close the opening.
Using two strands of embroidery floss knotted at the ends, insert the needle through the top of the pumpkin. Referring to the pattern, wrap the floss around the pumpkin three times. Knot at the top and trim.
Roll the stem into a cylinder and glue the end to secure. Glue the stem to the top of the pumpkin with a leaf on each side. Place the pumpkin between the bear's paws.
11/03
|