How The Saddlebag Service Project Came To Be
Beverly Marek's mother, Marion Windstrup, was under hospice care in 1995. When Beverly visited her mother and took personal items to her, there was no place to put them within her mother's reach because of her limited range of motion. This need led Beverly to design and make the first "hospital bed saddlebag." Marion loved her saddlebag and requested that upon her passing the bag be given to someone else in the Hospice Program. Not only did Beverly give the first of one away but she made it her mission to make more of them.
Saddlebags are a great addition to anyone who must spend time in a wheelchair.
Materials Needed
- Fabric 1 - 22" wide x 33" long quilted back (round the corners)
- Fabric 2 - 5/8 yd. of 44" matching solid color cotton or cotton blend fabric cut into 22 wide strips as follows:
- 2 -11" strips, 1 - 9" strip, 1 - 7" strip
- Fabric 3 - 5/8 yd. of 44" coordinating print of cotton or cotton blend fabric cut into 22": wide strips as follows:
- 1 - 11" strip, 1 - 7" strip, 2 - 6" strips, 6 - 2" strips for binding
4 of 1/2" or 3/4" Velcro cut into two 2 strips
Patient Pockets
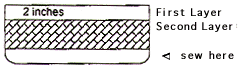
First Layer (Newspaper/magazine pockets):
1. With right sides together, sew 6" x 22" print piece to 11" x 22" lining piece along 22" top edge in a 3/8" seam. On opposite side of patterned piece, fold up 3/8" and press.
2. Turn wrong sides of both lining and print piece together. Press. Top stitch in 3/8" seam at top and bottom along 22" edge.
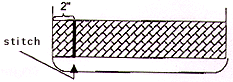
Second Layer (Middle Pockets):
3. Repeat steps 1 and 2 using 6" x 22" print piece and 9" x 22" lining, but top stitch at top only.
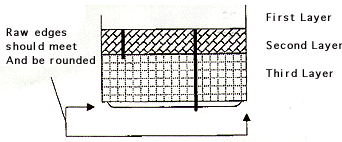
Third Layer (Bottom Pockets):
4. With right sides together sew 7" x 22" print piece to 7" x 22" lining piece along 22" top edge. Turn wrong side together. Top stitch along top edge. (do not fold up and press print piece on this layer.)
Opposite End of Quilted Base (Nurses' Pockets):
5. Repeat step 4 using 11" x 22" print and lining pieces.
Pocket Placement
6. Place finished top edge of second layer 2" below finished top of first layer. Sew lower print seam of second layer to first layer (at bottom of turned-up edge) all the way across the 22" edge.
7. Measure 5 1/2" from left side as you face fabric. Sew a vertical seam from top of second layer to bottom edge of second layer.
8. Line up third layer with unfinished edge even with unfinished edges of layers 1 and 2. The finished edge will be approximately 2" below the top finished edge of the second layer. All print showing.
9. Starting at top of finished edge of second layer and 2" to right from center of bag, make a vertical seam through the second and third layers. Pivot and make a horizontal seam 2" from the bottom to the center. Then extend vertical seam to bottom edge.
10. Line up print layers with sides and bottom of quilted base. Sew all layers together in a vertical center seam, from top of first layer to unfinished edge at bottom.
11. Trim unfinished pocket edges so they are uniform with quilted base. Run a long stitch at outer edges of sides and bottom to keep layers smooth.
12. On opposite end of quilted base, repeat steps 10 and 11 to form Nurses ¼ Pockets.
13. Binding: Right sides together, sew ends of 2" strips to form one long binding piece. With right side of binding on wrong side of saddlebag edge, stitch in 3/8" seam, easing binding at curved corners. With raw edge turned in (wrong sides together) turn finished edge to right side of saddlebag. Topstitch.
14. Sew strips of Velcro to back side of saddle bag as follows: Find center point of length of saddlebag. Measure 3 - 1/2" each side of center point for placement of Velcro. (This will leave a 7" gap between the strips which will stick together.) Place strips 1" from side of saddlebag lengthwise of fabric.
|