|
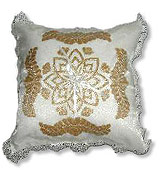
 When only the best will do, embroider this elegant pillow. When only the best will do, embroider this elegant pillow.
Materials and Supplies
- 1/2 yard gold lamé
- 1/2 yard sheer organza
- 1/2 yard satin (cut into two 15" squares)
- 1-1/2 yard, 2"-wide bridal lace
- 1-1/2 yard of 1/4"-wide white satin ribbon
- 14" pillow form
- White polyester thread for sewing
- White embroidery thread from brother (001)
- Brother PC6500, PC8200, PC-8500 or ULT2001/ULT2002D
- 5” x 7" embroidery hoop
- Brother Card No. 58
- Templates for designs No. 31 and No. 38
- Water soluble marking pen
This project is specific to a particular brand of sewing machine, notion, fabric and/or supply. However, the project may be easily adapted to other brands.
Level of Difficulty: Beginner
 Embroidery Directions Embroidery Directions
1. Using 1/2 yard piece of sheer organza, lay template on fabric and mark placement for designs beginning with the center design (No. 31).
2. Load marked organza in hoop.
3. Insert card into machine and select design No. 31. Place hooped fabric in machine.
4. Slide gold lamé under hoop. Stitch design with white embroidery thread.
5. Remove fabric from hoop. Carefully trim excess gold lamé from backside of design close to stitching line.
6. Rotate fabric in order to stitch the matching side of center design. Using the template markings, load fabric in hoop. Slide another piece of gold lamé under hoop. Stitch design.
7. Unhoop fabric and carefully trim excess fabric from back of stitched design.
8. Mark placement for side designs using design No. 38 from the card.
9. Load fabric for one side, slide gold lamé under hooped fabric and stitch design. Unhoop fabric and trim close to stitching line.
10. Repeat for 3 remaining sides.
11. Press the pillow top from wrong side. Starch if desired.
Sewing Directions
1. Cut 1/4" satin ribbon in half. Layer one ribbon on top of the other at a 90-degree angle. Using the button sew-on feature, tack ribbons to pillow top in center.
2. Trim embroidered organza to 15" square.
3. Baste to one 15" satin square.
4. Pin bridal lace in place around outside edges of pillow top, mitering corners. Sew in place using 1/4" seam.
5.Placing the two 15" satin squares wrong sides facing each other, stitch the four sides together using a 1/2" seam allowance. Leave an 8" opening on one side to insert pillow form.
6. Insert pillow form and slipstitch opening closed by hand.
Project developed by Keri Morales, Education Consultant
4/04
|


