|
Whether it's picnic time, Halloween, or the winter doldrums, it’s always right for a snappy hat for your hound. Choose your favorite or use the ideas to create a hat that fits your dog’s personality. The hats have been developed for greyhounds but are perfect for any four-legged canine companion.
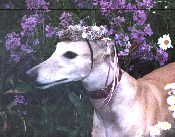 Greygirl Floral Wreath Hat Greygirl Floral Wreath Hat
These simple-to-make floral wreaths bring out the medieval grace and elegance of your greygirl or any pooch. They're flashy yet tasteful, and stay on the head well. If you want to participate in costume contests but don't want your hound to look goofy, this is a nice choice.
Materials Needed
- 4-inch grapevine wreath (or make your own out of any vine-y plant)
- bit of spanish moss
- 10 or more feet of thin satin ribbon (use one color or several)
- 8-12 small satin roses in coordinating colors
- one 11-inch piece of 1/4 inch elastic
Instructions
1. Attach the 11-inch piece of elastic to the bottom of the wreath to form a chinstrap. Hand-sew or use hot glue.
2. Cut six to eight 18-inch pieces of satin ribbon and tie them to one strand of vine in the wreath, placing the knot in the middle of the length of ribbon, so that two sets of ribbon streamers are formed. Attach them on the underside of the wreath where they will be nearest the neck of the hound.
3. Hot glue the Spanish moss to the top of the wreath. Glue it really well to withstand head shaking and such.
4. Take a 2-foot piece of satin ribbon and hot glue one end to the wreath in an inconspicuous place. Gently and loosely wrap the ribbon around the wreath 5 to 7 times, ending up where you started. Hot glue in place and trim away excess ribbon.
5. Hot glue or hand-sew satin roses in place.
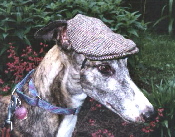 Greyguy Sporty Irish Hat Greyguy Sporty Irish Hat
This sporty Irish hat fits the character of greyhounds especially, but will suit the personality of many dogs. You can make them out of any fabric, but the Irish plaids look the best – a very distinguished yet playful look for your hound.
Materials Needed
- 1/4 yard of wool plaid or tweed fabric
- one 5-inch circle of poster board or thin cardboard
- one 11-inch piece of 1/4-inch elastic
Instructions
1. Cut one 11-inch circle of fabric and two 5-1/2-inch circles of fabric.
2. Cut a 5-inch circle of poster board or thin cardboard.
3. Hand-baste 1/2 inch from the edge of the 11-inch circle, then pull the threads to draw the circle up as tightly as possible. This will form a bag-like item. Be sure the right side of the fabric is out. Tie the threads to secure the circle.
4. Place the 5-1/2-inch fabric circles right sides together and sew with a 1/4-inch seam allowance around the entire circle. Clip curves.
5. Carefully cut an X in the center of one of these fabric circles and turn right side out. Iron flat.
6. Carefully squish and squeeze the poster board into the fabric circle. It’s okay if the poster board bends.
7. Top-stitch 1/4 inch from the edge, sewing through the poster board and the layers of fabric. This is now the brim of your hat.
8. Attach the brim to the first circle. Be sure to put the side of the brim with the X cut in it to the side of the big circle with the gathers. You may want to slightly offset the brim circle from the large circle so the brim sticks out slightly. You can hot glue or hand-stitch these together.
9. Attach the elastic to the brim to form a chinstrap. The hat will lay best if you attach the elastic about 1 inch in from the edge of the hat on each side. You can hot glue this or sew it, although sewing stands up better.
Variation: Instead of a solid-colored 11-inch circle, sew 6 pie-shaped pieces of fabric of different colors to form the initial circle. This results in a very nice look.
 Greygirl Pillbox Hat and Tutu Greygirl Pillbox Hat and Tutu
The look of glamour is achieved with this simple satin pillbox hat, embellished with sequins, tulle, and rhinestones. Add a simple tutu and you've got a very flashy look in no time!
Materials Needed
- Hat: 1/4 yard of fabric (satin or shiny lining works best)
- Hat: piece of poster board or thin cardboard at least 18" long
- Hat: one 1-inch piece of 1/4-inch elastic
- Hat: 5-inch square of paper-backed fusible web
- Tutu: 1 to 3 yards of tulle or netting (more for a fuller tutu)
- Tutu: 2 feet of 1-inch-wide elastic
Hat Instructions
1. Cut a 1-inch strip of poster board at least 18 inches long. (A rotary cutter works great for this.)
2. Cut an oval out of the poster board. The exact shape is not important – it really doesn't show with all of the embellishments. Ideally, it should be 4 inches across the long side of the oval and 3 inches across the short side.
3. Carefully hot glue the 1-inch strip to the edge of the oval to form the pillbox shape. Work on a disposable surface such as aluminum foil since some hot glue usually oozes out. Finish the strip by overlapping it onto itself by about 1 inch and gluing securely. Trim off any extra. Don't worry about glue globs or irregularities; they'll all be covered up.
4. Iron the 5-inch square of paper-backed fusible web to the wrong side of the fabric. Place your poster board hat on the paper side of the fusible web and loosely draw about 1/2 inch extra around the shape of the hat. No need to be exact here. Cut on the line you just drew.
5. Remove the paper backing and iron the fabric oval on to the top of the hat, leaving the 1/2-inch overhang all the way around. Don't leave the iron on the fabric too long or the hot glue you used to construct the hat will melt, and be careful not to burn your fingers.
6. Snip the overhang every 1/2 inch or so. Now go back to the iron and iron down each little “spoke” of the overhang created by the snip. This will form a smooth top with a nice corner.
7. Place the hat on the remaining fabric and draw around the edge. Cut just inside this line to form an oval just the size of the hat. Hot glue this oval with right side up to the inside of the hat.
8. Cut a 4-inch strip of fabric, at least 18 inches long. (Longer is okay and will give you a fudge factor.) Iron this in half with wrong sides together to form a long 2-inch-wide strip. Open this up and iron each side in to the center crease. Fold the strip in half along the original first crease and press again. The result is a 1-inch-wide strip with nice, clean edges.
9. Hot glue the strip to the hat. First glue the outside all the way around, then the inside. The folds and creases in the strip will line up perfectly with the top and inside edges of the band of the hat. When you get to the end, fold over and glue. Don't worry about imperfections--your embellishments will cover them.
10. Hot glue the elastic strip to the inside of the band of the hat to form a chinstrap.
11. Now comes the fun part. Embellish your hat with sequins, silk flowers, pieces of tulle, ribbons, bows, rhinestones, plastic fruit, or whatever you have.
Tutu Instructions
1. Fold the tulle or netting in half and half again to form as many layers as you'd like in the skirt. With a 1-yard piece of tulle, 4 layers are good. For 2 yards of tulle, try 8 layers. Do not cut the folds; it's much easier to work with this way.
2. Pin together the layers of tulle on the side where the elastic will go. It's going to look like the tulle is much too long and could be wrapped around your dog several times. It will shorten considerably when you add the elastic.
3. Secure the tulle to the elastic with a few stitches. Now the hard part: stretch the elastic (both in front of and in back of the presser foot) while you sew it onto the tulle. You'll be sewing down the middle of the elastic, which may end up giving you a 3/4-inch seam allowance. Stretch the elastic as much as you can to get the maximum fullness in the final tutu. You will have extra elastic when you get to the end of the tulle.
4. Loop the extra elastic back to where you started sewing and secure with a few stitches. This forms the waistband of the tutu.
5. Now cut along the folds of the tulle on the free edge. You might also want to round off any square edges. Fluff the tulle and your tutu is finished!
Projects courtesy of Jack and Amy Corrigan
10/04
|


