The members of the Evansville, Indiana Chapter of the American Sewing Guild were challenged by their Project Chairman to make at least two projects a month in 1998. These projects could be each member’s choice or an item suggested in the bimonthly newsletter. This special project is a Lap Robe – ideal for people who are in wheelchairs.
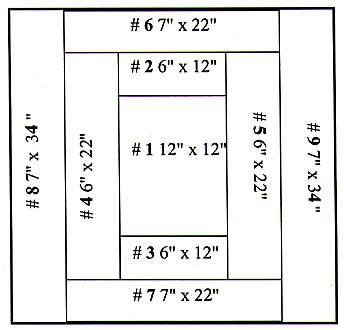
Cut the following
One 12" x 12" square (#1)
Two 6" x 12" rectangles (#2 and #3)
Two 6" x 22" rectangles (#4 and #5)
Two 7" x 22" rectangles (#6 and #7)
Two 7" x 34” rectangles (#8 and #9)
One 39"-square for the back
One 39"-square of batting
Instructions
Apply a spray adhesive to the wrong side of the quilt back.
Place the quilt batting on the adhesive and smooth it out. Find the center of the batting/back unit, and pin piece #1 (12" x 12") in the center of the batting side, right side up.
Place piece #2 (6" x 12") on top of piece #1, right sides together, and sew through all layers (piece #2, piece #1, batting, and backing) with a 1/2" seam allowance.
Unfold piece #2 into its finished position with right side up, press, and keep in place with pins or spray adhesive.
Proceed in the same way with pieces #3 through #9.
Trim the quilt batting to desired width, and finish the quilt by folding the quilt back around the raw edges of the batting to the front. The corners may be finished by stitching a square or by mitering. Turn under the raw edge and topstitch in place.