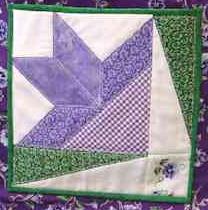
The quilt block can be photocopied and enlarged (150%) to make a 10” x 10” block. Cut the block apart to create templates, adding 1/4” seam allowances to all sides. The bindings should measure 2” wide. The finished block size is 9-1/2” x 9-1/2”.
10” square for backing (choose a print to go with each particular project)
Instructions
Using 1/4” seam allowance throughout, sew quilt block in the following order:
1. Sew A1 to A2.
2. Sew B1 to A1 and B2 to A2.
3. Sew C1 to B1/B2.
4. Sew E1 to B1/A1.
5. Sew D1 to A1/A2.
6. Sew E2 to A2/B2.
7. Sew F1 to F2 and F3 to F4.
8. Sew F1/F2 to B1/C1.
9. Sew D2 to F3/F4
10. Sew the resulting two units together.
11. Layer and baste the quilt block using the method of your choice.
12. For short bindings, fold binding strip in half (wrong sides together) and sew on with 1/4” seam. Press binding over the seam allowance and then to the wrong side. (Tip: To use the quilt block as a pocket, stitch in the ditch along the top portion only.)
13. Complete the long bindings the same as for the short sides and pin quilt block in place on the project.


 The quilt block can be photocopied and enlarged (150%) to make a 10” x 10” block. Cut the block apart to create templates, adding 1/4” seam allowances to all sides. The bindings should measure 2” wide. The finished block size is 9-1/2” x 9-1/2”.