|
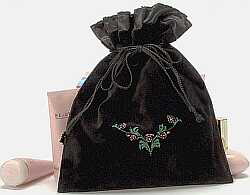 This quick and easy embroidered velvet pouch makes a great gift, or match the embroidery design or color velvet to go with your attire or personality. This quick and easy embroidered velvet pouch makes a great gift, or match the embroidery design or color velvet to go with your attire or personality.
Important Note: These project instructions are specific to the Janome Memory Craft embroidery machine; however, the project can be adapted for use on other machines.
Supply List
- Janome Memory Craft 10000, 9000, 5700, 5000
- Embroidery Hoop
- Clothsetter 10000, III, II, or I
- Embroidery Foot P
- Zig-Zag Foot A
- Satin Stitch Foot F
- Janome Embroidery thread
- Janome Bobbin thread
- Blue Tip needle 75/11
 Fabric and Notions Required Fabric and Notions Required
- Sulky® Sticky© stabilizer
- Sulky® Solvy© stabilizer
- 3/8 yard velvet or velveteen
- 3/8 yard satin
- 2 yards cord (1/2" or less in diameter)
- All purpose thread
Fabric Preparation
1. Cut one piece 11" x 24" from velvet or velveteen.
2.Cut one piece 11" x 29" from satin.
3.Find center of one of the 11" sides of the velvet.
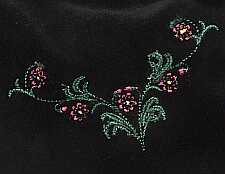
4.Measure down approximately 8" from this center point and mark the placement of your chosen design.
Note: This measurement may change with the size of the design chosen. Mark very carefully with a small mark so velvet will not be marred.
5.Place Sticky© stabilizer in the embroidery hoop.
6.Using the Clothsetter for perfect placement, hoop wrong side of velvet against Sticky© stabilizer.
7.Place 1 layer of Solvy© stabilizer on top of velvet.
Instructions
1.Set up the Memory Craft for Professional Style embroidery.
2.Attach hoop to machine.
3.Memory Craft 10000 owners, select Built-in Design #5. Rotate design 315˚, using the Edit screen. Or select a suitable design from a Memory Card.
4.Embroider selected design.
5.Remove velvet carefully from hoop and stabilizer.
6.Set up the Memory Craft for ordinary sewing.
7.Thread machine with all-purpose thread.
8.Attach the Zig-Zag Foot A.
Hint: The Roller foot or Even Feed foot can also be used.
9.Place one short end of velvet to one short end of satin, right sides together.
10.Stitch using a 1/2" seam.
11.Repeat for the other short end.
12.Turn fabrics right side out. Smooth and fold fabrics to form 1" satin hem at each end. Press this fold carefully to form a crease.
13.Turn fabrics right sides together. Pin together, matching seams. Mark an opening on one long side for turning.
14.Stitch both long sides, leaving opening for turning. Clip corners. Turn fabric right side out. Be sure to push out corners. Press.
15.Attach Satin Stitch Foot F.
16.Memory Craft 10000 and 9000 owners should select Decorative Stitch #53. All others should select a scallop or decorative stitch of choice.
17.Stitch along satin fold edge on one short end. If you are going to trim your scallop edge, be sure to fray check the design; let dry and then cut the edge carefully.
Hint: If you are going to start your design on the edge of the satin, hold the thread "tails" and lightly pull on them toward the back of the machine to assist the feeding of the edge.
18.Measure 1" from seam line between satin and velvet. Stitch across fabrics at this 1" mark, parallel to seam line. Back stitch at beginning and end of seam.
19.Stitch again on a line 1-1/2" from velvet/satin seam (1/2" from previous stitching). Backstitch at the beginning and end of seam.
20.Repeat decorative stitching for other short end.
21.Fold pouch in half with satin side right sides together, to form lining.
22.Match sides and seams. Stitch from second sewn seam line (1-1/2" from velvet/satin seam) to bottom of pouch on both sides.
23.On one side of the pouch, stitch above first stitch line (1" from velvet/satin seam) toward top of pouch. End this stitching at velvet/satin seam. Repeat on other side.
24.Carefully remove stitches on pouch sides between the seam 1" from velvet/satin seam and the seam that is 1-1/2" from velvet/satin seam.
25.Thread a cord through this casing and tie ends to form drawstring.
26.Thread another cord through opposite side of pouch and tie ends to form double drawstring.
Project created by Lee Fisher
12/04
|


