Jewelry with ribbon ties and beads are so in vogue right now — they are literally everywhere. You can create your own one-of-a-kind necklace with Wrights® ribbon and your choice of beads. It is such fun and so easy, you will want to make several. One that's elegant and sophisticated for an evening out, or a business power lunch, or how about going fun and funky to wear with a denim jacket. Ours can serve dual duty and go dressed up or down!
Materials
1 1/2 yds. Wrights® 3/8" Porcelain Blue Satin Ribbon (#219-721-121)
12 4mm to 8mm Assorted Blue and White Crystal Beads (for connectors and drops)
1 1/2" to 3/4" Large Hand Painted Bead for Center Drop
1 3/4" Blue Tube Bead with Large Hole to Thread onto Ribbon
2 3/4" Blue Glass Oval Flat Beads
3 3/16" Silver Rings that Open
3 2" Pin Heads
3 2" Eye Pins
Wire Cutters
Needle Nose Pliers
Large Eye Needle
Instructions
Thread ribbon through tube bead. Use needle if necessary.
Thread a silver ring onto each side of the tube bead and tie a knot with the ribbon, securing the ring in place.
To make the two connectors, thread three small crystals onto eye pins. Leave a 3/8" piece of wire showing after the beads. Cut off excess with wire cutters. Make a small loop with needle nose pliers.
To make the two side drops, thread a crystal and a flat oval blue bead onto a pin head. Leave 3/8" piece of wire showing. Cut off excess with wire cutters. Make a small loop with needle nose pliers.
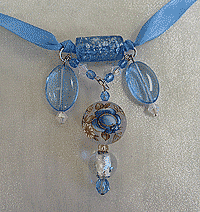
Open rings on either side of the tube bead. Thread connectors onto ring so they are the closet to the tube bead. Thread the side drops onto the ring next to the connectors. Close ring with pliers. See illustration at right.
Pull the end of the connectors together and thread them onto the third ring.
Thread remaining beads onto the last pin head. Leave 3/8" piece of wire showing. Cut off excess wire with wire cutters. Make a small loop with needle nose pliers.
Thread center drop onto middle ring. Close ring with pliers. Tie on with a small bow. Show your creativity and have fun. Once you start you won't want to stop.


 Thread ribbon through tube bead. Use needle if necessary.