|
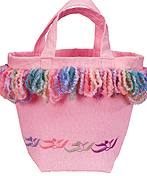
 Creating one-of-a-kind bags is fun, and a great way to showcase your creative talents! This whimsical bag began with a basic shape, and we added a touch of embroidery, and splash of color and texture. The loopy fringe is made from Red Heart® Baby Clouds™ yarn, and that is just the beginning. Creating one-of-a-kind bags is fun, and a great way to showcase your creative talents! This whimsical bag began with a basic shape, and we added a touch of embroidery, and splash of color and texture. The loopy fringe is made from Red Heart® Baby Clouds™ yarn, and that is just the beginning.
Coats offers a wide range of products, each designed to inspire creativity. We invite you to explore and enjoy — the ideas are endless!
Skill Level: Easy
Materials
- Coats Rayon Thread (D63, D83, D74) or Coats Polyester Embroidery Thread (D75)
- Coats Polyester Bobbin Thread (D78)
- Coats Dual Duty® All-purpose Thread (Art. 210)
- Red Heart Baby Clouds or Light & Lofty Yarn (E710 or E708) to coordinate with fabric
- Fabric: ½ yard
- Interfacing: 1 yard (optional)
- Stabilizer
Tip: If fabric needs more body in order to hold it’s shape when sewn into a bag, fuse interfacing to the wrong side of the fabric before constructing bag.
Instructions
Cutting
Straps: Cut two strips 3" x 16". Cut on the lengthwise grain for stronger straps and to reduce stretching.
- Back & Front: Cut 2 of the diagram (Fig 1)
- Interfacing: Cut 2 of the diagram (Fig 1)
Sewing
Straps: Fold strips lengthwise with right sides together.
Stitch the length of the strap using a ¼" seam allowance.
Turn to right side. Press.
Embroidery: If desired, fuse interfacing to wrong side of the front and back bag fabric. Select a pattern or design for embroidery. Choose colors to coordinate with yarn and compliment or contrast bag fabric. Place stabilizer under fabric and embroider design. With right sides together, stitch the bottom of the bag, then the side seams together using a ½" seam allowance.
To shape the bottom corners, fold bag with one side seam centered on the bottom seam. Sew across bag 2" from the corner.
On top edges of bag front, measure and mark 4" from each seam for placement of the strap. Baste one short end of strap to the bag centered over the first mark, edges even. Baste the other end of the strap over the second mark. (This may seem upside-down, but strap will be folded up in the next step.) Repeat for back.
Press ¼" to wrong side at top of bag, then press 1¼" to inside of bag. With straps in upright position, stitch around top of bag, close to upper and lower folds. Double stitch strap areas.
Loopy Fringe: Wrap yarn around fingers 5 or 6 times. Slip yarn off fingers and place end of loops over the line of stitching 1" from top edge of bag as shown in Fig 2.
Note: The bulk of the yarn should be to the right of the machine needle.)
Set machine for a zigzag stitch. Stitch yarn to bag (Fig 3), stopping once the group of loops is sewn. Wrap yarn around fingers again, place on bag and sew. Don’t worry if loops are not the same size, that’s part of the look! Continue in this manner all the way around the top of bag. Loops will fall down over stitching like fringe when bag sits upright.
Designed by Lynn Browne
5/07
|

